What You'll Need
-

Garlic Bulbs
How many garlic bulbs is really up to you. 6 medium bulbs should do the trick starting out, but if you want to play it safe you can always get more. I just grabbed a mesh bag of garlic from the produce section in Walmart, and used just over half of it.
-

100% Pure Honey
Despite what many people say, you actually don't need raw honey. The garlic itself inhibits yeast growth and has enough bacteria to start the fermentation. That said, if you really want raw honey, you can always get it from a local seller. Avoid imported honey, and at the very least get pure honey from an online brand.
-

Lidded Glass Jar
I used a basic Mason jar for this, and it worked great. You'll need something that can seal pretty well, and quite literally won't crack under pressure. If you're buying a new jar, let the amount of garlic dictate the size of jar you get.


Instructions

1. Separate the Garlic Bulb into Cloves.
Separate the garlic into cloves. A good way to do this is by making one palm flat and using your weight to press your hand down onto the garlic. As this video says, it's sort of like "Garlic CPR". 😊

2. Peel the Garlic.
To peel the garlic, start with Martha Stewart's Two Bowl Method. Find two similarly-shaped bowls, put the garlic cloves into one bowl, and place the other bowl on top so they're facing each other.
Hold the two bowls together tightly and shake vigorously for 20 seconds. Results may vary, this worked decently for me, and at the very least took away 30% of the work. To be fair, since I didn't have two similar bowls, I was forced to use a bowl and a pot cover, which could explain why it didn't work so well. You can throw out the peels (and put the peeled cloves in a separate bowl), and go again as many times as you'd like.
When you've had enough of the bowl method, I recommend peeling the remaining cloves by hand. Many people use a knife to keep their hands clean, but this might take a bit longer, and I prefer plugging in a podcast and getting my hands "dirty" :)


3. Clean your jar
It's really important to use a clean, sterilized jar for fermenting. Just wash it with hot soapy water (or run it through the dishwasher) and rinse it well. Make sure the jar is completely dry before you get started.

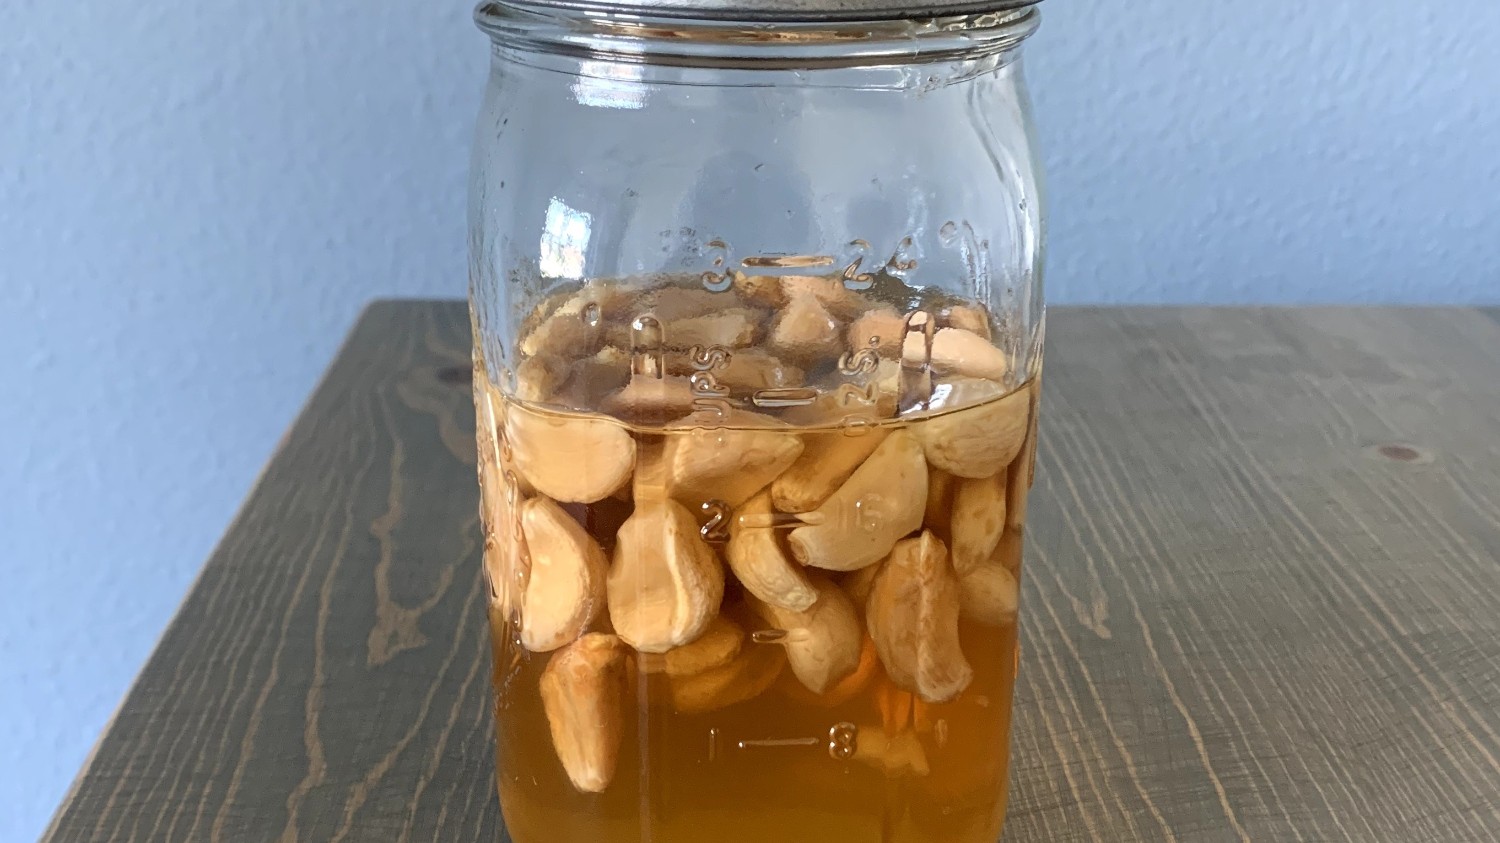
3. Combine garlic and honey
Dump the peeled garlic cloves into the sterilized jar. Pour the honey over the garlic cloves, ensuring they are completely submerged. You may need to use a spoon to press down on the garlic cloves to release any air bubbles trapped inside.

4. Fermentation
Once the garlic cloves are fully submerged in honey, cover the jar with a lid. Over the next 1-2 weeks, you'll begin to see bubbles form due to the pressure, which means the fermentation is working! That said, make sure you're "burping" the jar once a day (more on that below).

5. Storage & Burp-age
Place the jar in a dark, room-temperature location for fermentation. A pantry or cupboard works well. Avoid direct sunlight as it can affect the fermentation process. Make sure you burp the jar every day (meaning you slowly open the lid to release some pressure), and then tighten the lid again. Open the jar slowly so that the gas doesn't let out too fast, which is potentially dangerous. If you open it too quickly, the lid could be forced open by the pressure... sort of like opening a shaken-up two liter of soda, but with a metal lid instead of a small plastic cap. Be careful. Once you've opened the lid and burped the jar, simply twist the lid back on and put the jar back in the pantry.

6. Wait, check, and Maybe Flip?
Allow the garlic and honey mixture to ferment for at least 1-2 weeks. As mentioned earlier, at this time you may notice bubbles forming, which is a sign that fermentation is occurring. Check the jar periodically to ensure the garlic cloves remain submerged. It's a good idea fermentation-wise to flip the jar upside down once (which further smothers the cloves in honey), but since this really increases the pressure, you'll have to make sure you're EXTRA careful when burping the jar. I tried flipping the jar once, and when I flipped it upside down to burp, it led out a large, semi-scary "POP". Moral of the story: if you choose to flip, be extra careful.

7. Taste and adjust
After 1-2 weeks, taste the fermented garlic and honey. The garlic flavor won't be as strong, but you'll still taste hints of it. For me, it almost tasted like a spicy & sweet fruit. The texture (not flavor!) for me was somewhere between a cooked onion and a wet apple (similar to slices in an apple pie), and while I know that sounds really weird, it actually tasted pretty good. If you prefer a stronger flavor, you can always let it ferment for a longer period.
Note: I wouldn't eat the fermented garlic on an empty stomach. I tried that and it hurt my stomach a bit, which wouldn't be the case if I gave my stomach more non-fermenting foods to digest at the same time. Hindsight's 2020 though :)

How to Store Garlic and Honey (Pt. 2)
Once you're satisfied with the flavor, you can transfer the jar to the refrigerator to slow down the fermentation process. Properly fermented garlic and honey can last for several months when stored in the refrigerator.
Garlic and Honey Tips/FAQs

Garlic and Honey Benefits
Fermentation helps garlic produce more allicin. Allicin is formed when garlic is crushed or chopped, and it has strong antimicrobial and antioxidant effects. Allicin is really effective against bacteria, viruses, and oxidative stress. The garlic-honey duo becomes a powerhouse for immune support and respiratory health. Allicin's ability to support cardiovascular health (by reducing blood pressure and cholesterol) is the perfect complement to honey's role in soothing coughs and boosting your digestive wellness.

How Long Does Garlic and Honey Last?
When properly stored in the refrigerator, fermented garlic in honey can last for several months, often up to a year or more. Just make sure your jar is tightly sealed, and once you put it in the fridge, no need to continue burping.

Garlic and Honey For Cough, Colds, and Sore Throats
There's some scientific evidence that garlic and honey might help both a cold and a cough. The allicin produced by garlic can potentially combat infections in the respiratory tract and reduce inflammation, easing coughing. Honey coats the throat and has soothing properties that can help relieve irritation and calm cough reflexes. Additionally, honey can help reduce nighttime coughing in children.

Raw Garlic with Honey or Cooked Garlic?
When making fermented garlic and honey, stick with raw garlic. Cooked garlic produces less allicin than raw garlic, and you want as much allicin as possible.
Here's a good article on allicin if you want to learn more.

Do You Get the Same Benefits with Minced Garlic?
The jury's not out on whether or not minced garlic will work. It may work quicker due to more surface area, but just be on the lookout for mold (not saying definitively that it'll happen, someone just mentioned that on Reddit). If this is your first time, I would stick to raw garlic cloves, but if you try minced, make sure to leave a comment and let us know how it goes!
Share Your Two Cents!